Tuesday, April 28, 2009

Un-Sesame Chicken

Un-sesame chicken means I forgot to buy sesame seeds at the store to make my sesame chicken. Hmm..I think that means this week is way too busy! I am booked every night this week except Friday, which sometimes makes me forget things!

I am so excited about our awesome new kitchen countertops and backsplash. The boys are working on the backsplash..I can't wait to share pictures! Our fence is almost complete also--just in time for the enormous amount of rain we got yesterday.
This is toward the back of our yard, and obviously taken in the dark. It was like this about 1/3 of the way through the back of our yard. Thankfully not much of it tried to come inside, like it did many other places in our area. One whole neighborhood got flooded east of us, and people were being rescued by boat at 3 AM this morning. It makes me really thankful for our makeshift pond in the backyard a little rain in through the windows...
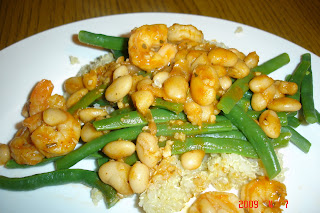
So back to the meal. I got it from here and am listing the recipe below as I made it. If you would like to see the original version, click the link, and she has a better picture! Use whatever veggies you want. I beefed it up (wait, can shrimp beef something up?) with a little shrimp thrown in there and some approved veggies. Served over brown rice.
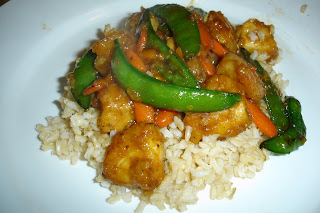
Sesame Chicken and Shrimp
Ingredients:
1/2 c all purpose flour
1/4 c sesame seeds, divided (uhhh..if you don't have them, it does in fact still taste good!)
1/2 t black pepper
1/2 t Chinese five spice powder (fennel and some other stuff--makes me sneeze but adds good flavor!)
1/2 t Cayenne pepper
2 boneless skinless chicken breasts, cut into chunks
1/2 pound shrimp (blot dry after rinsing)
6 T teriyaki sauce
2 T low sodium soy sauce
4 T honey
2 T oil (for frying)
your choice of veggies
Combine flour, half of the sesame seeds, black pepper, five spice, and cayenne in zip bag. Add chicken and toss to coat.
Heat 1 T oil in wok over medium high heat. Remove chicken from bag, shaking off excess flour mixture, and cook in pan for about five minutes on each side, or until browned and done. Add shrimp to the remaining flour mixture in the bag and toss to coat.
Add 1 more T oil to wok (could get by with a little less on both fry turns) and add shrimp and veggies to wok. Cook, stirring frequently, until veggies are crisp tender and shrimp is pink. (if you used already cooked shrimp, basically just heat it up!).
Add chicken back to wok.
Reduce heat to low and add honey, teriyaki, and soy sauce to wok. Simmer and stir, allowing sauce to thicken. Sprinkle in the rest of the sesame seeds and serve over brown rice.

Monday, April 27, 2009

His: Seafood "Salad"

While making some things to have in the fridge for throughout the week, I had to include Norris in the planning, obviously! We don't necessarily like the same things. We both like the main dishes, but I'll make more veggie based dishes for myself and more starchy based dishes for him for sides. I made this recipe from my All Recipes book for him a few times last summer and fall, and he was requesting this again this week. I call it his "salad" because I guess you call it a salad because everything's mixed together? Hey, it keeps us both eating more at home, and I like to make things that he likes, too!
see, look at all those colors you can get from using different kinds of cheese... :)
Crab Salad III

(there are probably a million out there, but this lady must have been the third to submit hers??)


3 cups cooked pasta
3/4 cup light mayo
1 T white vinegar
1 t lemon juice
1 1/2 t Splenda or other sweetener
1/2 t garlic powder
1/2 t dried dill weed
1/2 t dried basil
1/2 t dried oregano
12 oz. imitation crabmeat (I used shrimp that I chopped up)
1 small green pepper, diced (this is where I really started to stray..didn't use!)
1 sweet onion, diced (yeah, didn't use that either)
1/2 c diced black olives (nope)
5 radishes, diced (definitely not)
1 tomato, seeded and diced (you guessed it..)
1/2 c diagonally sliced celery (if I would have included this, it would have sat in the fridge until I threw it away)
1/2 c shredded cheese (had to add this to make up for the veggies, of course! I used some mozzarella and some sharp cheddar)

In a large bowl, whisk together mayo, vinegar, lemon juice, Splenda, garlic powder, dill, basil, and oregano.
Add pasta to bowl and toss to coat. Add all the other ingredients, refrigerate, and serve cold.

Saturday, April 25, 2009

Hers: Broccoli Salad

We have been eating saltines as a snack lately, so I decided I better actually buy some food other than dinner food at the store this week. I wanted to make some things I would like and some things Norris would like, so here's our his and hers salads!

For my bridal luncheon, my grandma requested that each guest bring a recipe for me to add to my collection. I was looking for some new ideas for this week, and came across the little file she made to put them in--fun to look back to a year ago about this time! My cousin Carianne, who I have mentioned here before for her recipes I like, gave me her recipe for broccoli salad. This would be a great side to bring to a potluck type thing, but don't forget it has mayo and leave it sitting on a picnic table all afternoon! I used the full amount of broccoli, but only made half of the dressing amount originally called for. I normally like just enough dressing on things to taste it, and this amount did the trick for me.


Broccoli Salad
2-3 bunches of broccoli, cut into florets
1 cup dried cranberries (used golden raisins)
1 small can sliced water chestnuts
roasted sliced almonds (however much you want?)
1/2 cup light mayo (could sub nonfat plain yogurt here)
1/4 cup sugar or other sweetener of choice
1 T apple cider vinegar
salt and pepper to taste

Combine broccoli, cranberries, and water chestnuts in a large bowl. In small bowl, combine mayo, vinegar, sugar, salt, and pepper. Cover broccoli with mayo mixture and toss together. Top with sliced almonds. Serve cold.

We have a fun few weeks ahead of us! This week, we are going out to dinner with some family members that until the last year, we didn't get to see a lot. This year, I actually get to see one of them every single day, as he is my student aide for one of my classes! So great to reconnect with family!

My class is putting on the dinner for the high school's dinner theater this week, which will be happening Thursday, Friday, and Saturday night. They are putting on "And Then There Were None" by Agatha Christie, which is a psychological thriller. We are planning on about 180 people throughout the three nights. We get to go to the show Thursday night, which I am excited about!
Another exciting thing coming up for my class is that we were asked to put on the senior breakfast, which means feeding approximately 425 people at 7:30 in the morning on a Tuesday! What was I thinking when I agreed to that???? We are trying to think of all things we can make ahead, and that will be inexpensive to make. We have some ideas, but mostly obvious ones like pancakes, eggs, and bacon. Any other good ideas would be appreciated!

S'more of what?

We loved to watch Sandlot when we were younger...how can I have some more if I haven't had any yet??

These are a great change from the regular brownie (as if you needed a change??). The only changes I would make next time: put more mallows on top and bake this in a 9x13 plus one of those half size baking dishes to make them not quite so thick. This was almost the thickness of a cake, just a really dense brownie like one. They were yummmmmy! Definitely teenager approved! I got these from a really cool baking website, Joy the Baker.


S’mores Brownies

adapted from Bon Appetit, October 1991
1 1/2 cups all purpose flour
2 teaspoons baking powder
1 teaspoon salt
1 cup (2 sticks) unsalted butter
6 ounces unsweetened chocolate, chopped
5 large eggs
1 1/4 cups dark brown sugar
1 cup granulated sugar
2 teaspoons vanilla
1 cup graham cracker, roughly crushed with your hands
12 big marshmallows (I also diced 6 additional marshmallows and stirred them into the batter. These marshmallows dissolve when baked, so you can leave them out, or throw them in. Up to you!)
Preheat oven to 350°F. Butter 9×13-inch baking pan with 2-inch-high sides. Combine first 3 ingredients in small bowl. Stir butter and chocolate in a medium sized bowl over a heavy saucepan of simmering water. Stir chocolate and butter in this double boiler until melted and smooth.
Beat eggs, sugar and vanilla in large bowl to blend. Stir in warm chocolate mixture, then dry ingredients. Fold in graham crackers. Pour batter into prepared pan. Dot with 12 large marshmallows. Bake until toothpick inserted into center comes out with moist crumbs attached, about 30- 40 minutes minutes.
Marshmallows will be browned and puffy but will deflate as the brownies cool. Cool for at least 20 minutes than slice with a sharp knife, cleaning the knife with hot water if it gets too messy and sticky. Serve or wrap individually in wax paper for storing.

Friday, April 24, 2009

Bagel Chips

Another super simple thing I will make again! I picked up some day old bagels and decided to make bagel chips out of them.

(picture yesterday with avocado dip!)

3 bagels, unsliced
nonstick cooking spray
oregano
garlic powder

Preheat oven to 350.
Slice bagels in very thin slices horizontally. The easiest way to do it is to press down on the top with your palm and then cut. Just don't cut your hand!
Lay bagel slices out on pan in single layer.
Spray bagles lightly with cooking spray and sprinkle with oregano and garlic powder.
Bake for about 10-11 minutes, or until crispy.

Thursday, April 23, 2009

Avocado Dip

I was really craving some good guacamole last week, but thought I'd better at least try to find a slightly healthier version. Ashlee had the perfect recipe for me. She suggested serving this as a dip with sweet potato fries, which sounds awesome. I had a snack of it with bagel chips, which was really good too. I think it would be good with cucumbers dipped in it too. Last night I had it as a salad dressing on my salad of greens, strawberries, crushed bagel chips, and grilled chicken. It was awesome! It kept well in the fridge for about four days before I had to throw out the last little bit (browning avocado).

Avocado Dip

Avocado Dip:
1 Haas avocado
1/2 cup plain lowfat organic yogurt
2 tbsp. light sour cream
1 jalapeno, seeded and chopped
2 scallions, white and light green part only, chopped
1 lime, juiced
Salt and freshly ground black pepper

Place the avocado, yogurt, sour cream, jalapeno, scallions, and lime juice into a blender or small food processor.
Blend for 1 minute or until you have a smooth paste.
Season with salt and pepper, to taste.

Wednesday, April 22, 2009

Happy Birthday Mom!!

We spent a fun night in KC's Power and Light area last night celebrating my mom's birthday. We got there early enough to hang outside for a while, go to McFadden's, and then eat at Tengo sed Cantina. It was soooo good! Their chips and salsa were definitely better than most places. My mom's birthday is today, and her good friend Marcia's birthday was just yesterday, so we've been able to celebrate them together many times! This time, all of the kids and our boys were able to go, and it was a great night out. We haven't all been together in quite a quile (besides our wedding, but not much time to talk there!) and it was so fun to laugh at some of the stories from growing up on the same street.
She and I are going to celebrate our birthdays together this summer when we go visit her high school friend in Florida! This will be our third trip and we always have so much fun.

I won't tell you how old she is, and you can't spin the picture far enough to read the button that is on her necklace:) She definitely doesn't look her age!!

Happy Birthday Mom--hope it's a great day!! Love you!


I had to include this picture--it's one of my recent favorites! When Norris and I first got engaged, my mom pulled her dress out of storage just to look at and play with...and she definitely still fit in it! The hat is our favorite part:)

And my parents...my dad will be celebrating the same monumental birthday later this year..better start planning! :)

Tuesday, April 21, 2009

Easy Dessert: PB Choc Chip Bars

A coworker and I head up the "Best Teen Chef" club here at school, and we try to do a few simple things and a few more involved things throughout the year. We only have 45 minutes to make, cook, serve, and clean, so we have to be quick and creative!
We got this from the 101 Things to do With a Cake Mix book, which is pretty fun to look through! I love that everything is so simple and if you were invited somewhere last minute, they are so quick to throw together. We had spare time at the end, even after baking and answering questions about different things AND doing a survey for next year!

No pictures--picture this in your head: 18 teenagers waiting to eat something that smells like peanut buttery chocolatey goodness in the middle of the morning when their stomachs growl the most! They were GONE!

Peanut Butter Chocolate Chip Bars

1 yellow cake mix (or chocolate chip cake mix)
2 eggs
1/3 c vegetable oil
1/2 c peanut butter (chunky preferred)
1 c chocolate chips

Preheat oven to 350 F.
Mix together cake mix, eggs, and oil. Mix in peanut butter. Stir in chocolate chips.
Pat the mixture into a 9x13 inch pan.
Bake 14-17 minutes, or until golden brown.

Stuffed Shells Take Two

After making taco stuffed shells, I still had some shells left, along with some extra mushrooms and a few wedges of Laughing Cow to use up, so I came up with a beef and mushroom stuffed shell with cream sauce. Oh, and I also discovered tonight that I definitely do NOT like roasted broccoli. Gag!! I love it fresh and steamed, so I guess I'll stick to that. Two strikes: paprika and roasted broccoli.Beef and Mushroom Stuffed Shells
1 lb. ground beef (or turkey, chicken, deer, whatever)
~8 mushrooms, chopped
2 oz fat free/light cream cheese
1 T minced onions (dried or fresh)
1/2 t oregano
1/2 t basil
1/2 t parsley
1/2 c water
1 1/2 c low sodium beef broth
18 jumbo pasta shells

2 wedges Laughing Cow cheese
1 T light margarine/butter
1 1/2 c skim milk
2 T flour
salt and pepper to taste

1/4 c fat free mozzarella cheese, shredded

1. Cook pasta shells according to box directions. Drain, rinse, and set aside to cool.
2. Brown beef, drain, rinse, and return to pan. Add 1/2 c water plus mushrooms and parsley, oregano, and basil. Simmer for 10 minutes.
3. Preheat oven to 425. Pour beef broth into a 9x13 baking dish.
4. After beef mixture has simmered, add cream cheese and keep on low heat. Stir together so it melts in with the mix.
5. In a small saucepan, melt the Laughing Cow and butter together. After melted, quickly whisk in the flour. After this has formed a ball, slowly pour in the milk, whisking constantly. Let this simmer for about 5 minutes or until thickened (basically like making gravy) and season to taste with salt and pepper.
6. To assemble shells, fill each shell with a portion of the mixture and place in baking dish. Pour cream sauce over the top. Cover with foil and bake for 20 minutes. After 20 minutes, uncover, top with mozzarella, and bake for an additional 10-15 minutes, or until cheese melts and is slightly browned.


(This is done a lot quicker than it seems with the steps. Clean up is all done by the time it comes out of the oven! I think when I make these next time, I will get them assembled the night before. They would be a quick easy thing to stick in the oven the next night with no mess at all.)


and Norris' catch of the day. Guess who's having a fish fry?!?
You can also see a glimpse of our fence in progess! I won't even pretend like I've been a good helper, unless you count making dinner for them to eat when they're done working... :)

Monday, April 20, 2009

Strawberry Lemonade Cupcakes

When I saw this recipe, I wanted to make them right then. I figured I better have a special occasion to make them for though, so my mom's birthday was the perfect time! We love Sonic cherry limeades and strawberry limeades, and it's spring, so this was the perfect birthday dessert to make for her. You have to look at the pictures from the original source--she's really good at this stuff! I think I'll stick to cooking rather than baking until I can get my decorating skills down...
If you're not feeling up to the icing, do it the "cheater" way: buy a can of regular creamy strawberry icing and whip it with your whisk attachment mixer for a few minutes until it's light and fluffy. Fill a big Ziploc with it and snip off a corner. Voila! (or, maybe that's why mine don't look so hot?:))
The recipe is originally from Williams Sonoma.


Strawberry Lemonade Cupcakes

Yield: about 21 cupcakes
Ingredients:

For the cake:
2 1/4 cups all-purpose flour
1 1/2 tsp. baking powder
3/4 tsp. salt
2 tsp. lemon zest
12 tbsp. unsalted butter, at room temperature
1 1/2 cups sugar
2 eggs
3/4 cup milk
2 cups fresh strawberries, chopped

(lemonade syrup optional---just adds a more pronounced lemon flavor) DO THIS!! SO GOOD! I only made about 2/3 of the amount and still had extra
For the lemonade syrup:
1 cup lemonade concentrate, thawed
3/4 cup confectioners’ sugar

For the frosting:
1 cup fresh strawberries, roughly chopped
12 oz. cream cheese, at room temperature
18 tbsp. unsalted butter, at room temperature
2 2/3 cups confectioners’ sugar, sifted
3 tsp. lemon juice
1 tsp. vanilla extract

For garnish:
Fresh strawberries
Lemon slices

Directions:
To make the cupcakes, preheat the oven to 325 degrees F. Line muffin pans with paper liners. In a bowl, combine the flour, baking powder, salt and lemon zest. Stir together with a fork and set aside. In the bowl of a stand mixer, beat the butter on medium speed until it is light and fluffy. Add the sugar and beat until well combined. Beat in the eggs one at a time, scraping down the bowl after each addition. Add half of the flour mixture to the bowl and beat on low speed until just incorporated. Add in the milk and mix until smooth. Add in the remaining flour mixture and mix on low speed until just blended. Fold in the fresh strawberries with a spatula.
Divide the batter evenly between the paper liners, filling them about 3/4 full. Bake about 20 to 25 minutes or until a toothpick inserted in the center comes out clean. Allow to cool in the pan 5 minutes, then transfer to a wire rack to cool completely.
Once the cupcakes have cooled, whisk together the lemonade concentrate and confectioners’ sugar in a small bowl to make the lemonade syrup. Poke several holes in the top of each cupcake with a skewer and pour the syrup over the cupcakes, allowing it to soak in. (Place wax paper underneath your cooling rack so you don’t make a mess!)
To make the frosting, puree the strawberries in a food processor or blender. Strain the puree through a mesh sieve to remove the seeds, and set aside. Beat the cream cheese and butter in the bowl of an electric mixer on medium speed until smooth and very fluffy, about 5 minutes. Add the powdered sugar and mix until smooth. Add the lemon juice and vanilla extract and mix until incorporated. Mix in strawberry puree, a tablespoon at a time, until you achieve your desired texture and flavor of frosting (I added about 7 tablespoons of puree). Frost cupcakes as desired and garnish with fresh strawberries and lemon slices.
Source: cake adapted from Williams Sonoma, frosting from Annie’s Eats

Sunday, April 19, 2009

Mexican Green Beans

I have had this recipe from CDKitchen printed off for a long time because it sounded like a good spin on veggies. I served it as a side with margarita chicken. Norris really liked these...me, not so much. Since this is a place for me to keep recipes I'll make again, I decided to go ahead and post. This is the first time since I've known him that I was the one giving him my leftover vegetables! So, that means I'll be making them again, and just make something else for myself! I think the real issue is that I love fresh green beans with just salt and pepper so much that I don't need the different flavors.


Mexican Green Beans


2 T oil (I used about 1 T, because what fun would it be to follow a recipe exactly?!?:)
2 T flour
3 T chili powder
3/4 c water
salt
1/4 t garlic salt
16 oz green beans (thaw them if you're using frozen)
1/2 c grated cheddar, optional


Directions:

In saucepan, heat oil. Brown flour. Dissolve chili powder in water and add to flour mixture. Add salt to taste and garlic salt. Stir in green beans. Add cheese. Cover and simmer until cheese melts. Keep covered until ready to serve.

Saturday, April 18, 2009

Margarita Chicken

This recipe is another from Lovestoeat, who got it from Too Shai Shai. I served it with mexican green beans. My picture=not so hot. The chicken=awesome! I marinated for about three hours. I served it over some black beans and rice with a little lime juice squeezed on top. This was really good. I think it would be good in a tortilla too (but what isn't, really?)


Margarita Chicken

1/4 cup lime juice
2 tablespoons gold tequila
2 tablespoons honey
1 tablespoon canola oil
1/4 teaspoon garlic salt
1/4 teaspoon ground black pepper
2 skinless, boneless chicken breast halves
1 Haas avocado, sliced (I didn't use)

1. Mix together all ingredients, except avocado, in a Ziploc bag. Marinate chicken in refrigerator for at least one hour. (Don't do this overnight, unless you leave the lime juice out; add lime juice in last few hours or so)
2. Preheat grill over medium high heat. Remove chicken from marinade. Discard marinade. Grill chicken 10-15 minutes or until cooked through.
3. Serve chicken topped with avocado slices.

Friday, April 17, 2009

Breakfast Power Muffins

I have no idea where this recipe came from. I had it randomly printed off and it just says "super power muffins" at the top. If you made it up, let me know! They're great--full of good ingredients (minus the brown sugar...) and taste like peanut butter and bananas, which is one of the best combos I can think of!

Power Muffins

1 cup brown sugar, not packed
1/3 cup peanut butter
1 banana
1/2 cup of unsweetened apple sauce (or use carrot puree or another banana)
1 egg
1 cup whole wheat flour
1 t baking powder
1 t baking soda
1/2 t salt


Preheat oven to 350 F.
Mix flour, baking powder, soda, and salt together in one bowl.
In another bowl, mix all other ingredients well. Sift in dry ingredients and mix until blended.
Bake for 15-18 minutes in lined muffin tins.
Makes 11 muffins (probably should make 12? Mine made 11..)

Thursday, April 16, 2009

Whole wheat pizza dough

When Gram and Granddad came down to teach cream puffs, they also brought a folder full of other things, including Granddad's own food photography! They also brought a recipe for whole wheat pizza dough made in the food processor, so I decided to give it a try. Then tonight, when I was making this, I realized I don't actually have a food processor. Hmm...some nights my kitchen feels stone age! I don't know that I actually would use a processor that often, but duh!

This recipe is from Eating Well, a website with a ton of good stuff. I like it more each time I try a recipe from there. I really like that you can store it for up to two days after making the dough, making it a simple make ahead recipe. Norris said I finally found the recipe I should stick to on the pizza crust, so I think I'll do that!


Whole Wheat Pizza Crust


1 pound dough
ACTIVE TIME: 5 minutes
TOTAL TIME: 15 minutes
EASE OF PREPARATION: Moderate

To make 1 pound dough:
1 cup whole-wheat flour
1 cup all-purpose flour
1 package quick-rising yeast (2 1/4 teaspoons), such as Fleischmann's RapidRise
1 teaspoon salt
1/2 teaspoon sugar
3/4 cup hot water (120-130°F)
1 tablespoon extra-virgin olive oil

1. Combine whole-wheat flour, all-purpose flour, yeast, salt and sugar in a food processor; pulse to mix. Combine hot water and oil in a measuring cup. With the motor running, gradually pour in enough of the hot liquid until the mixture forms a sticky ball. The dough should be quite soft. If it seems dry, add 1 to 2 tablespoons warm water; if too sticky, add 1 to 2 tablespoons flour. Process until the dough forms a ball, then process for 1 minute to knead.
2. Transfer the dough to a lightly floured surface. Coat a sheet of plastic wrap with cooking spray and place it, sprayed-side down, over the dough. Let the dough rest for 10 to 20 minutes before rolling.
3. Place a pizza stone or inverted baking sheet on the lowest oven rack;preheat oven to 500°F or highest setting. Roll and top the pizza as desired(we suggest a 13-inch circle) and bake the pizza until the bottom is crispand golden, 10 to 14 minutes. Serve immediately.

NUTRITION INFORMATION: Per 12 ounces: 766 calories; 12 g fat (2 g sat, 8 g mono); 0 mg cholesterol; 142 g carbohydrate; 26 g protein; 16 g fiber; 1,882 mg sodium.Per 1 pound: 1,032 calories; 18 g fat (3 g sat, 12 g mono); 0 mg cholesterol; 189 g carbohydrate; 33 g protein; 21 g fiber; 2,509 mg sodium.
MAKE AHEAD TIP: Store in a plastic bag coated with cooking spray in the refrigerator for up to 2 days. Bring to room temperature before using.

excuse the terrible night lighting, but my pizza boy wanted to pose! :)

Wednesday, April 15, 2009

Apple Spinach Salad

This recipe came from a site with lots of other great recipes, Delicious Meliscious. I changed the amounts of some of the ingredients below--I used half of the amount of dressing ingredients, and we prefer mixed greens and romaine, so I used those lettuces instead. Make the dressing the night before to get it good and chilled--if it has too much bite for you, add a dash of honey or a little more sugar. I LOVED this salad this way and will definitely be making it again and again!


Apple Spinach Salad

from Delicious Meliscious


Ingredients:
8 oz of whatever greens you like
1 Granny Smith Apple, chopped
1/3 c. Cashews, toasted
1/4 c. Golden Raisins
2 T Sugar
2 T Apple Cider Vinegar
2 T Vegetable Oil (I used olive oil)
1/8 t. Garlic Salt
1/8 tsp. Celery Salt

Directions:Combine the first 4 ingredients in a large salad bowl. Whisk together sugar and next 4 ingredients, until blended. Serve with salad. You can chill the dressing for up to 1 day. Whisk well before serving.

Tuesday, April 14, 2009

Spiced Lentil Tacos

This recipe is from Self Magazine, but I had to change it a little according to our preferences and what I already had in the cabinets...I also added a little ground turkey to make it more appealing to Norris. I still had lentils left over from the soup, and still have some left in the bag, and it only cost about $1.50! They were really great--be sure to mash the lentils at least a little so that they aren't too hard on the outside. You could also soak them for a while before starting the recipe to loosen the outer shell. I thought they tasted just about the same as regular tacos, but are much better for you!


Spiced Lentil Tacos

Serves 4

1 tablespoon olive oil
1 clove garlic, chopped
1/2 teaspoon salt
1 cup dried brown lentils, rinsed
1 package (2.25 oz) taco seasoning
2 1/2 cups vegetable broth (used beef broth instead)
1/2 cup fat-free sour cream
8 taco shells
1 1/4 cups shredded lettuce
1/2 cup shredded reduced-fat (2 percent) cheddar
1 T Mexican seasoning (or chili powder, cumin, ground red pepper, whatever you have)


Heat oil in a large skillet over medium-high heat. Cook garlic and salt for 2 minutes, or until garlic is releasing fragrance. Add lentils and taco seasoning. Cook until spices are fragrant and lentils are dry, about 1 minute. Add broth; bring to a boil. Reduce heat, cover and simmer until lentils are tender, 25 to 30 minutes. Mix sour cream and Mexican seasonings in a bowl. Uncover lentils and cook until mixture thickens, 6 to 8 minutes. Mash with a rubber spatula. Spoon 1/4 cup lentil mixture into each taco shell. Top with 2 heaping tsp sour cream mixture, lettuce, tomato and cheese.
(I added in the cooked ground turkey at the very end, stirring it in with the lentils)

THE SKINNY
249 calories per 2 tacos, 7.1 g fat (1.9 g saturated), 37.1 g carbs, 9.7 g fiber, 11.5 g protein

Monday, April 13, 2009

There's no place like home, but I loved Dallas!

We had such a great weekend in Dallas! I got to meet a bunch of Norris' college friends I hadn't met before, and some other people. John and Haley's wedding was so pretty--check out this cake!

The wedding was held at a really nice winery, with a cocktail hour after the ceremony, then the reception back inside. The centerpieces were so pretty and she did a great job planning it all. We had such a good time all weekend. We wound up going to a place called the Glass Cactus (click on link to look at the pictures, click on photos at the top--it has an awesome outdoor deck!) two nights in a row because we had so much fun the first night. It reminded me more of Vegas than any other place I've been outside of Vegas.

Anyway, back to "real life", although it was great to get away for a weekend, and for a great reason to celebrate!

Sunday, April 12, 2009

Steak Fajitas

As part of the culinary classes, we occasionally do food sales (mostly just cookie sales!!). The kids chose a menu of fajitas, chips and cheese, and sopapillas, so I needed to find the right recipes that students and teachers would like. I chose this fajita marinade recipe for its ease and seemingly mass appeal. The original source is Simply Recipes. The result was tender steak pieces with a hint of lime. I really loved the veggies!


Steak Fajitas

Ingredients:
1 lb of flank steak or skirt steak

1 large yellow onion, peeled and sliced with the grain, not against the grain as one would normally slice an onion. (Slice first in half, and then slice off sections a half inch wide at widest point.)

2 large bell peppers, stemmed, seeded, de-ribbed, sliced lengthwise into half-inch wide strips

Marinade:
Juice of 1 lime
2 Tablespoons of olive oil
2 cloves garlic, peeled, minced
1/2 teaspoon ground cumin
1/2 fresh Jalapeño pepper, seeded, ribs removed, finely chopped
1/4 cup chopped fresh cilantro, including stems


Directions:
Mix all marinade ingredients.
Set the steak in the marinade and let it sit at least an hour, the longer the better. (except the lime juice--if you are marinating longer than an hour, put the lime juice in the last hour or so)
Heat to high heat a large cast iron pan or griddle.
Add a teaspoon of olive oil to the pan.
Add the steak, frying on each side for 3 minutes, or to desired doneness. Three minutes per side will yield approximately medium rare doneness for an average cut of flank steak. (If pan starts to smoke too much, reduce the heat to medium high. We want the steak browned, not burned.)Remove from pan and let sit for 5 minutes.
Reduce the pan heat to medium high.
Add a little more oil to the pan if necessary.
Add the onions and bell peppers.
Cook, stirring frequently, for 5 minutes, until the onions are slightly translucent.
Slice the meat against the grain into thin slices.
If you slice the meat at a slanted angle, you will be able to get your slices pretty thin. (Flank steak is flavorful but can be a little tough, so thin slices will really help make it easier to eat.)Serve immediately with shredded cheese, salsa, shredded iceberg lettuce, sour cream, guacamole and warm flour tortillas.
Serves 4.
Source: Simply Recipes

Thursday, April 9, 2009

Turkey Burgers II

I am so excited for this weekend! We are going to Dallas for Norris' college friend's wedding with some other friends. Haven't been on a road trip out of our great state in quite a while! A little bummed that it happens to fall on Easter weekend, because we'll be spending our Easter driving back from Dallas. Find some extra eggs for me sis:)
Tonight's meal was definitely not planned, and it wound up being one of my favorites I've had in a while. I wanted to use up a few things before we left, so I made onion turkey burgers, fruit salad, and sweet potato fries. Really simple, not many dishes to clean, and really filling. I am still not sure how much the boys liked it (Norris doesn't really like onions, but he okay'ed the soup mix in the burger), but I loved it and will definitely make it again!


Simple Turkey Burgers
(hardly a "recipe", but simple and good!)
1 lb lean ground turkey
1 packet dry onion soup mix

Combine well with hands and form into patties. If you have time, refrigerate before you grill them (could make them the night before) to let flavors combine.
Grill!
Served on no sugar added whole wheat buns (Nature's Own--didn't even know they existed!) with a half wedge of Laughing Cow spread on the bun and broiled.

A tip for sweet potato fries:
After cutting into fries, soak in ice water for 20 minutes or so. This gives them a better crunchier outside, like a regular potato would. Drain and dry with paper towel. Toss in a bit of olive oil, salt, and pepper (some people like brown sugar here too). Cook at 450 for 25 minutes, flipping halfway.

Tonight is the first soccer game I am going to this season, and I am SO excited to get back in it, even if I am just watching!

Wednesday, April 8, 2009

Lightened up: Lemon Poppyseed Muffins

I love lemon poppyseed bread, but I'm not sure I love the nutritional stats! We love snack foods and breads around here, so I decided to try out Skinny Chef's version of the lemon poppyseed muffin. I originally saw this on Lovestoeat, who swapped orange for the lemon, which sounds like a good idea too! I decided to do half orange and half lemon. With the lemon, I added almond extract and with the orange, I used pineapple Malibu as my "extract"/flavoring! We had some sitting around and orange and pineapple sounded like a good combo.
The texture of these is great (like a dense cake), and the flavor combos worked out pretty well! I will be doing these again.

On a similar note (I guess?), I am considering searching for a copy of Bethenny Frankel's book...anybody read it and recommend it? She seems a little neurotic..I wonder if the book is the same way.


Lemon Poppyseed Muffins
From Skinny Chef

Ingredients:
2 1/2 cups all-purpose flour
1 teaspoons baking powder
1 teaspoon baking soda
1/4 teaspoon salt
2/3 cup sugar
1/2 cup low-fat, trans-fat free margarine, melted and cooled
1 egg white
1/4 cup low-fat, sour cream
1/4 cup fresh lemon juice
1 teaspoon lemon extract (optional)
1 tablespoon lemon zest
2 tablespoons poppy seeds

Directions:
Heat oven to 350º F. Grease and flour a 12-cup muffin tin or line with paper liners. Combine flour, baking powder, baking soda, and salt in a large bowl or zipper lock bag. Stir well to combine.
In a medium bowl, mix sugar and margarine until smooth. Stir in egg white, sour cream, lemon juice, extract, lemon zest, and poppy seed. Add flour and mix until a batter forms, about 10 strokes with a wooden spoon. Don’t over mix, otherwise your muffins will be tough.
Fill muffin tins three-fourths full. Bake for 20-25 minutes or until muffins spring back to the touch. Cool completely before storing in an air-tight container for up to 3 days.

Quinoa with Shrimp and Bean Saute

I am trying out quinoa for the first time after Jillian and I went on our inaugural trip to the awesome Whole Foods in OP. Another Eating Well recipe! I wanted to try something gluten free (the quinoa) to see if it settled my stomach down. Then I accidentally had a blueberry muffin with it. DUH!
Snapping the green beans made me long for summer and brought me memories of my mom and I in the kitchen snapping them and then simmering them for a long time and having just green beans for a few meals in a row. So good!!
Back to the food: Norris loved the meal, and I am still trying to decide if I like the flavor of paprika. I thought the meal was really good, but there was one flavor that just wasn't clicking with me, and I'm pretty sure it's the paprika. If you like paprika, or don't mind it, you'll really like this!


Paprika Shrimp & Green Bean Saute with Quinoa
ingredients adapted slightly from Eating Well


Makes 6 servings
Ingredients
4 cups green beans, trimmed (about 12 ounces)
2 tablespoons extra-virgin olive oil
3 T minced garlic
2 teaspoons paprika
1 pound raw shrimp (21-25 per pound)
1 16-ounce can great northern beans (or some kind of white kidney bean), rinsed
2 cups hot cooked quinoa
¼ cup sherry vinegar or red-wine vinegar
½ teaspoon salt
½ cup chopped fresh parsley, divided
Freshly ground pepper to taste

Paprika Shrimp & Green Bean Saute Instructions
1. Bring 1 inch of water to a boil in a large saucepan. Put green beans in a steamer basket, place in the pan, cover and steam until tender-crisp, 4 to 6 minutes.

2. Meanwhile, heat oil in a large skillet over medium-high heat. Add garlic and paprika and cook, stirring constantly, until just fragrant but not browned, about 20 seconds. Add shrimp and cook until pink and opaque, about 2 minutes per side. Stir in beans, vinegar and salt; cook, stirring occasionally, until heated through, about 2 minutes. Stir in 1/4 cup parsley.

3. Divide the quinoa among the plates. Top with green beans, then the shrimp mixture. Sprinkle with pepper and the remaining 1/4 cup parsley.

How to cook quinoa
(as instructed on the bin at WF!)

1 cup quinoa
2 cups cold water
1/2 t salt, optional

Soak the quinoa for 15 to 20 minutes in water in its cooking pot (different water from the 1 1/2 c). If you don't have that long, soak in hot water for 5 minutes.
Rinse and drain the quinoa.

Place quinoa in empty pot, pour 2 cups cold water over top, and add the salt. Bring to a boil, then cover with lid and reduce to simmering.

Simmer for 20 minutes.

Remove from heat and allow to sit with lid on for 5 minutes. Remove lid and fluff, just like rice!

Why quinoa is awesome:


It's not technically a grain, but we use it like one
It's the only "grain" that is a source of complete protein all by itself
It's gluten free
and many other nutritious benefits...look them up if you want to know more.

and I present my rigged steamer...I was thinking about buying a steamer basket, but thought it would take up a lot of space. This colander fits right down into my stockpot and a little saucepan lid fit tightly over the beans! So, if you don't have a steamer, give it a try! I'm still considering buying one so I can put more food into it to steam...we'll see...

Sunday, April 5, 2009

Taco Stuffed Shells

This meal is a great way to get one pound of ground beef (or turkey, or chicken) to stretch to feed about five people. In our house, that's a stretch, anyway!
This recipe is from this website, although there are a ton of different versions out there. Kraft foods has a version where you soak crushed Ritz in some milk, and then eventually add them to the meat mixture to add some more bulk. Sounds a little too meatloaf-y to me, so I'll stick to this one! We will definitely make this meal again.
As far as the pictures go, they weren't happening last night. I got one while I was prepping, and then one later when Norris got out the leftovers to have some more. If you want to see a good picture, click the original recipe link for step by step instructions!


Taco Stuffed Shells
adapted from blogchef for my non-salsa eating husband; check out the original version if you like salsa!

1 lb ground beef, turkey, or chicken
1 package reduced sodium taco seasoning
16 jumbo pasta shells (couldn't find in whole wheat version...tell me if you know where to find those!!)
4 oz. fat free cream cheese
1 cup mexican shredded cheese
2/3 cup taco sauce
1 cup tomato sauce
1 clove garlic, minced
2 t onion powder
1 t ground red pepper
1 1/2 cups tortilla chips, crushed (optional)
other topping as you like: green onions, sour cream, more salsa..

Brown ground beef, drain fat, and prepare according to taco seasoning directions.
Put a pot of water on to boil for pasta shells. Prepare according to package directions (mine boiled 10 minutes).
After taco meat is prepared, add cream cheese, cover, and simmer for about five minutes, until cream cheese is melted in. Stir it all together.
After pasta shells are done, lay them out so they aren't touching so they won't stick, or toss them in a bit of olive oil to do the same thing.
After meat is done, let it cool for about 10 minutes.
Preheat oven to 350 F.
Mix together tomato sauce, garlic, onion powder, and ground red pepper and pour in bottom of 9x13 baking dish.
Stuff each shell with meat mixture and place in dish. Pour taco sauce on top. Cover with foil and bake for 30 minutes.
After 30 minutes, uncover, sprinkle cheese and crushed chips on top, and bake for another 15 minutes. (great chance to clean the kitchen up:)

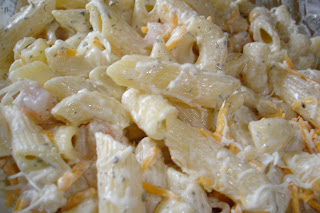
Pre-baking. I thought we could probably have gotten away with stuffing a couple more shells with the meat mixture, but I just overstuffed these instead!

Saturday, April 4, 2009

Laughing Cow Chicken


I have seen this cheese stuff on one of my favorite recipe swap websites, Hungry Girl, many times, and she has suggested tons of things to do with it. I remembered this one in particular and finally tried it tonight! This recipe has been popping up lots of places, so I decided we better finally give it a spin. If you haven't ever used Laughing Cow, buy the light in whatever flavor near the cream cheese and prepackaged Gorgonzola type stuff. 1 Weight Watchers Point per wedge, and you can do lots of things with it--make a light alfredo sauce, spread it on some bread and broil it, stir it in some pasta by itself...all for good swiss flavor.


This recipe comes together in about 10 minutes, then you can clean up while it bakes! We had it with green beans and mushrooms and toasted french bread. It was a really great meal!


Laughing Cow Chicken
(aka Mad Cow Chicken:)

2 chicken breasts, butterflied (cut almost in half horizontally, so that you can stuff them)
2 Laughing Cow cheese wedges
1 1/2 t Italian seasoning
3 T Italian or regular bread crumbs
2 T grated parmesan cheese
cooking spray


Mix cheese and Italian seasonings together in small dish.

Combine bread crumbs and parmesan cheese in shallow dish.

Preheat oven to 375 F.

Spread half of the cheese mixture on the inside of each chicken breast. Close the chicken breast so it looks like it's never been opened.

Spray each breast with a small amount of cooking spray and then dip both sides in the bread crumb mixture.

Bake for about 35 minutes, depending on the size of the chicken.

Friday, April 3, 2009

Cinnamon Torte

It's torte time in ProStart land, and I wanted to do something a little different. This torte has layers similar to thin snickerdoodles and cool whip. I changed the original measurements to how we had to change it how we went. The filling wasn't sweet enough, there was WAY too much of it, and if you really made this with all 30 layers, as it recommends, it would be about up to my knee. The recipe below will give you a more manageable amount of everything.


Cinnamon Torte
adapted from recipezaar Serves 10

Cookies:
1 3/8 cup flour
1 T cinnamon
3/4 c butter
1 c sugar
1 egg

Filling:
4 c whipping cream
1/4 c powdered sugar
1 T vanilla
1/2 c chocolate curls

1. With a mixer, beat butter and sugar until light and fluffy. Add egg with mixer running. Add flour and cinnamon a little at a time, mixing well after each addition.
2. Let dough rest 15 minutes.
3. While dough is resting, grease as many 9” layer cake pans as you have. (or line with parchment paper) and preheat oven to 375 F.
4. After 15 minutes, divide dough into 7 portions and pat one portion at a time into cake pan. It will be very thin but this is what makes your layers.
5. Bake for 8-12 minutes or until it starts to brown on the edges. Turn out of the pan and do it again until all layers are made.
6. At this point you can wrap and store these cookie layers until you are ready to use them, or go on with the assembly of the torte.
7. Whip the cream, vanilla, and powdered sugar together until stiff.
8. Set 3/4 c of cream mixture aside for the decorating the top of the torte.
9. Place a small amount of cream on the bottom of the cake plate to anchor your cake. Place your first cookie on it. Spread with cream and continue layering until all cookies and cream are gone.
10. Put the remaining whipped cream into a piping bag and do 8 rosettes on top.
11. Sprinkle with chocolate curls.
12. Refrigerate 4 hours to overnight before serving.

Thursday, April 2, 2009

Setting a good example

I am often challenged with setting a good example in front of my students. Even if you think they aren't watching, they are. When I think they are all just off in la-la land, they see and hear what I say and do. It kind of amazes me!
This means that I have a huge responsibility to be a good example for them. They need someone who can relate to them and also be a role model. Someone who can communicate and act like a professional. I try to do this every day, and can only hope I am doing my job of that. This job often seems to be even more important than teaching content. Only when both of those things are happening can you have a successful classroom.

I saw this article and am pretty amazed with this seemingly humble man who also happens to be in charge of the Kansas City Royals. This story is a really cool one--click the link to read. It's kind of a lenghty article, but a great read about someone who is in a position where he could be a role model of how to greedily live it up with the money he has or someone who can continue to stick to what they believe in and be a good example for so many people.

**(If you haven't figured out yet, the link is in the words "this article". I normally put my links within the sentence, normally on the word "this". With my color scheme on here, it's kind of difficult to tell. Wave your cursor over "this article" and it will turn purple! Click there:)

Wednesday, April 1, 2009

Cream Puffs


These have been researched and experimented with for many years by Gram, so here they are in all of their perfection!!

(our experimentation: milk/water, hand/mixer--led to a WHOLE bunch of cream puffs!)

I really can't ever believe how simple they are, ingredient wise. She has experimented with the merits of water versus milk, and says water works just as great. In the last few years, she has started to use a mixer after combining the final ingredients, and showed us how much of a difference this makes in the "puff" part of the cream puff. Try your hand at these!


(Ours of course are not as perfect as hers, but our attempt:)

Cream Puffs

1 cup water
1/2 cup butter
4 eggs, room temperature
1 cup all purpose flour


Preheat oven to 400 F.
Bring water and butter to a rolling boil.
Stir in the flour all at the same time. Keep stirring over low heat until it comes together in a ball (pulls away from the sides), about 1 minute.
Remove pan from heat and immediately put dough in mixer bowl.
Using a mixer, beat in eggs one at a time (don't want to scramble the eggs!!).
Beat mixture until it is smooth and velvety.
Drop from a spoon onto greased baking sheet, about three inches apart.
Bake until cream puffs are dry. Thump them on the bottom to see--they should sound like dense bread when you thump. Bake time for small puffs: 25 to 35 minutes; large puffs: 35 to 40 minutes
Remove puffs from oven and allow them to cool.

When puffs are cooled, cut off tops with a sharp knife. Remove the inner filament (the doughy strands). Fill with pudding or filling of your choice.

Replace tops, dust with confectioner's sugar, and serve! (best cold)


Makes 20 small puffs; 8 large puffs


She also reminded us how many possibilities there are with these...fill with chicken salad; add a little sugar when you add the flour and make a sweeter version; some people even put mashed potatoes, peas, and cheese in them!! (blech!!)

But these are totally meant to be filled with some sugar free lemon pudding (yes, it does exist!) and topped with some powdered sugar....or filled with some SF french vanilla pudding and topped with powdered sugar and chocolate sauce. YUM!!

Thanks again to G & G for coming to teach us the art of the puff!